
Okay, let’s talk snacks! You know how sometimes you just need something to munch on, but you don’t want to reach for those sugary, overly processed things? I’ve been there! That’s why I fell head over heels for making my own jerky. And let me tell you, my Chicken Turmeric Anti-Inflammation Jerky is a total game-changer. It’s so satisfyingly chewy, packed with flavor, and has this amazing golden goodness from the turmeric. I first started making it because I was curious about turmeric’s superpowers, and honestly, it just makes a darn tasty snack. Plus, knowing exactly what goes into it? That’s the best feeling!
Why This Chicken Turmeric Anti-Inflammation Jerky is a Game-Changer
Seriously, folks, this isn’t just *any* jerky. My Chicken Turmeric Anti-Inflammation Jerky is a little powerhouse of deliciousness and health! Forget those mystery ingredients you find in store-bought stuff – this is the real deal, made with love right in your own kitchen. Here’s why you’re going to love it:
- Turmeric’s Golden Touch: You know all that buzz about turmeric being good for you? Well, it’s true! It’s packed with curcumin, which is supposed to help with inflammation. Plus, it gives this jerky this gorgeous golden hue and a warm, earthy flavor that’s just fantastic.
- Healthy Snacking, Simplified: We’re talking lean chicken breast here, folks. It’s a fantastic source of protein, which keeps you full and satisfied. And making it yourself means you control exactly what goes in – no weird fillers or too much sugar!
- Flavor Explosion Alert!: Don’t let the “healthy” thing fool you. This jerky is bursting with flavor! The soy sauce, honey, and spices create this perfect balance of savory, sweet, and a little bit spicy-warm from the turmeric. It’s seriously addictive.
Honestly, once you try making your own, you’ll never go back. It’s just *so* good!

Gather Your Ingredients for Chicken Turmeric Anti-Inflammation Jerky
Alright, let’s get our game faces on and gather everything we need for this delicious Chicken Turmeric Anti-Inflammation Jerky! It’s pretty straightforward, which is always a win in my book. You’ll need:
- 1 pound of boneless, skinless chicken breast – I like to slice mine thin, about 1/8 of an inch thick, right before I marinate it.
- 1/4 cup of soy sauce – this is our salty, umami base.
- 2 tablespoons of honey – for that touch of sweetness to balance everything out.
- 1 tablespoon of olive oil – just a little bit for richness.
- 1 teaspoon of ground turmeric – the star of the show for that color and those healthy vibes!
- 1/2 teaspoon of garlic powder – because garlic makes everything better.
- 1/4 teaspoon of black pepper – just a little kick to round out the flavors.
See? Nothing too fancy, but trust me, these simple ingredients are going to work some magic!
How to Make Perfect Chicken Turmeric Anti-Inflammation Jerky
Alright, let’s get down to business and make some fantastic Chicken Turmeric Anti-Inflammation Jerky! It’s really not as complicated as you might think, and the results are SO worth it. Just follow these simple steps and get ready for the best homemade jerky experience!
Preparing the Chicken and Marinade
First things first, grab your chicken breast. You really want to slice it nice and thin, about 1/8 of an inch. I find it easiest to do this when the chicken is partially frozen – just a little bit firm, not rock solid. This makes for super clean cuts! Then, in a medium bowl, just whisk up all your marinade ingredients: the soy sauce, honey, olive oil, that gorgeous turmeric, garlic powder, and black pepper. Give it a good stir until it’s all combined into a beautiful golden mixture. If you’re curious about turmeric, you can check out this amazing golden paste recipe, though we’re using it a bit differently here!
Marinating for Maximum Flavor
Now for the fun part! Toss those thin chicken slices into the marinade and make sure every single piece is coated. Really get in there and massage it a bit if you need to – we want all that flavor to soak in! Once everything is nicely coated, cover the bowl tightly. Here’s where patience pays off: let it marinate in the fridge for at least 4 hours, but honestly, overnight is where the magic really happens. The longer it marinates, the more flavor your Chicken Turmeric Anti-Inflammation Jerky will have!
Baking Your Chicken Turmeric Anti-Inflammation Jerky
Okay, oven time! Preheat your oven because we need it nice and low, around 170°F (77°C). This is key for drying out the jerky without cooking it too fast. Line a couple of baking sheets with parchment paper – this makes cleanup a breeze. Now, carefully arrange your marinated chicken slices on the sheets. Make sure they’re in a single layer and not touching each other at all. If they overlap, they’ll just steam instead of drying, and you won’t get that perfect jerky texture. Pop them into the oven and let them bake for about 4 to 6 hours. The time really depends on how thick your slices were and how your oven behaves, so keep an eye on it. You’re looking for jerky that feels dry and leathery to the touch. Once they’re done, just let them cool completely on the baking sheets before you store them. Trust me, the smell alone is amazing!
Tips for the Best Chicken Turmeric Anti-Inflammation Jerky
Making your own Chicken Turmeric Anti-Inflammation Jerky is so rewarding, but a few little tricks can make it go from good to absolutely amazing. Here are some of my favorite tips to make sure your jerky turns out perfectly chewy, flavorful, and just right:
- Slice it Thin (and Even!): I can’t stress this enough – slicing the chicken thinly and uniformly is key. Aim for about 1/8 inch. If your slices are too thick, they’ll take forever to dry out and might end up chewy on the outside and still a bit moist inside. Partially freezing the chicken makes this SO much easier!
- Low and Slow is the Way to Go: That low oven temperature (around 170°F or 77°C) is your best friend here. It allows the chicken to dehydrate slowly without cooking. If your oven runs hot, you might need to prop the door open just a crack to keep the temperature down. Sometimes I even use a dehydrator if I have a big batch!
- Don’t Let Them Touch!: Seriously, give each piece of chicken its own space on the baking sheet. If they overlap, you’ll get steam instead of drying, and that’s the enemy of good jerky. You want that nice, leathery texture.
- The Dryness Test: How do you know it’s done? It should feel dry and leathery, bending without snapping. If it snaps, it’s overdone. If it’s still bendy and feels moist, it needs more time. Err on the side of slightly too dry if you’re unsure, as it firms up as it cools. You can always rehydrate with a tiny bit of water later if needed!
- Spice it Up (or Not!): While this recipe is tuned for deliciousness, feel free to play around! If you love a little heat, add a pinch of cayenne pepper to the marinade. And if you’re looking for other fun jerky ideas, check out these simple jerky recipes or even these dehydrator-friendly jerky recipes for more inspiration!
Follow these little tips, and you’ll be making stellar Chicken Turmeric Anti-Inflammation Jerky in no time!
Ingredient Notes and Substitutions
Alright, let’s chat about some of the ingredients because sometimes you might be missing a little something or want to tweak things. For this Chicken Turmeric Anti-Inflammation Jerky, the turmeric is key for that golden color and its health perks, but if you find the flavor a bit too earthy for your liking, you can slightly reduce it and maybe add a tiny pinch more black pepper to compensate. Now, if you’re out of soy sauce, coconut aminos are a fantastic gluten-free and soy-free substitute that works wonderfully. And for the honey? Maple syrup works beautifully too, giving it a slightly different, but equally delicious, caramelized sweetness. Don’t be afraid to play around a little!
Storing Your Homemade Jerky
So, you’ve made this amazing batch of Chicken Turmeric Anti-Inflammation Jerky – congrats! Now, how do you keep it fresh and tasty? Storing it is super simple. Once it’s completely cooled down, just pop it into an airtight container. You can keep it at room temperature for about 2 weeks. If you want it to last longer, or if your kitchen is on the warmer side, the fridge is your best bet – it can stay good in there for a good month or even longer!
Frequently Asked Questions about Chicken Jerky
Got a question buzzing around in your head about this delicious Chicken Turmeric Anti-Inflammation Jerky? I totally get it! Making jerky at home can bring up a few queries, so let’s dive into some of the most common ones. And hey, if you’re looking for more awesome ideas, check out these healthy chicken jerky recipes or these dried meat snacks!
Can I use chicken thighs instead of chicken breast?
You absolutely can! Chicken thighs are a bit fattier than chicken breast, which means they’ll result in a more tender and richer jerky. Just be aware that the cooking time might be slightly longer because of the extra fat, and the nutritional info (especially for fat content) will change. It’s still going to be super tasty, though!
My jerky seems too tough/chewy. How do I fix it?
Oops! If your jerky is a bit too tough, it likely means it dried out for a tad too long in the oven. Don’t despair! You can try rehydrating it by placing it in an airtight container with a slightly damp paper towel for a few hours. Or, next time, aim for a shorter baking time, and always test a piece mid-way through. You’re looking for that leathery, bendy texture, not something that snaps like a twig!
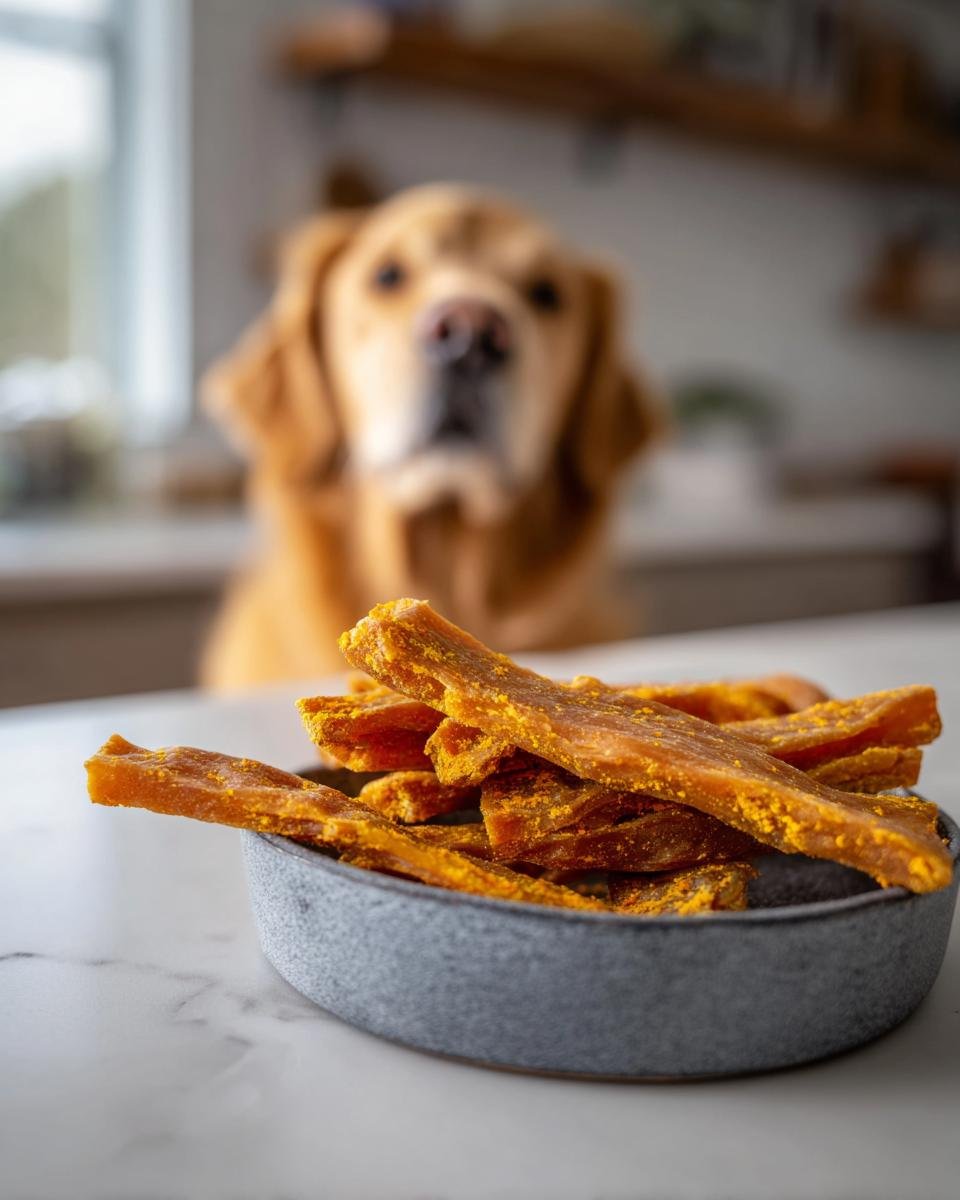
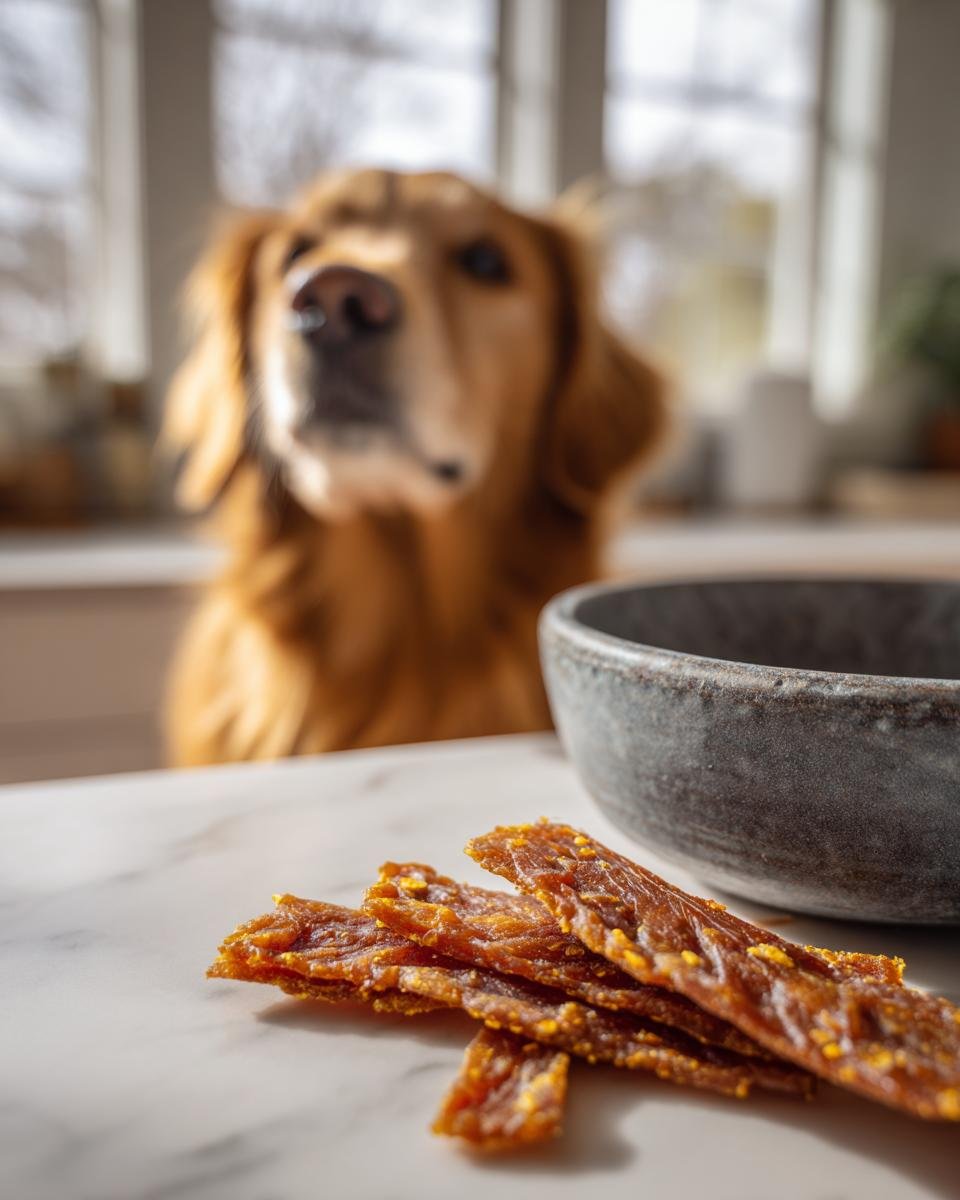
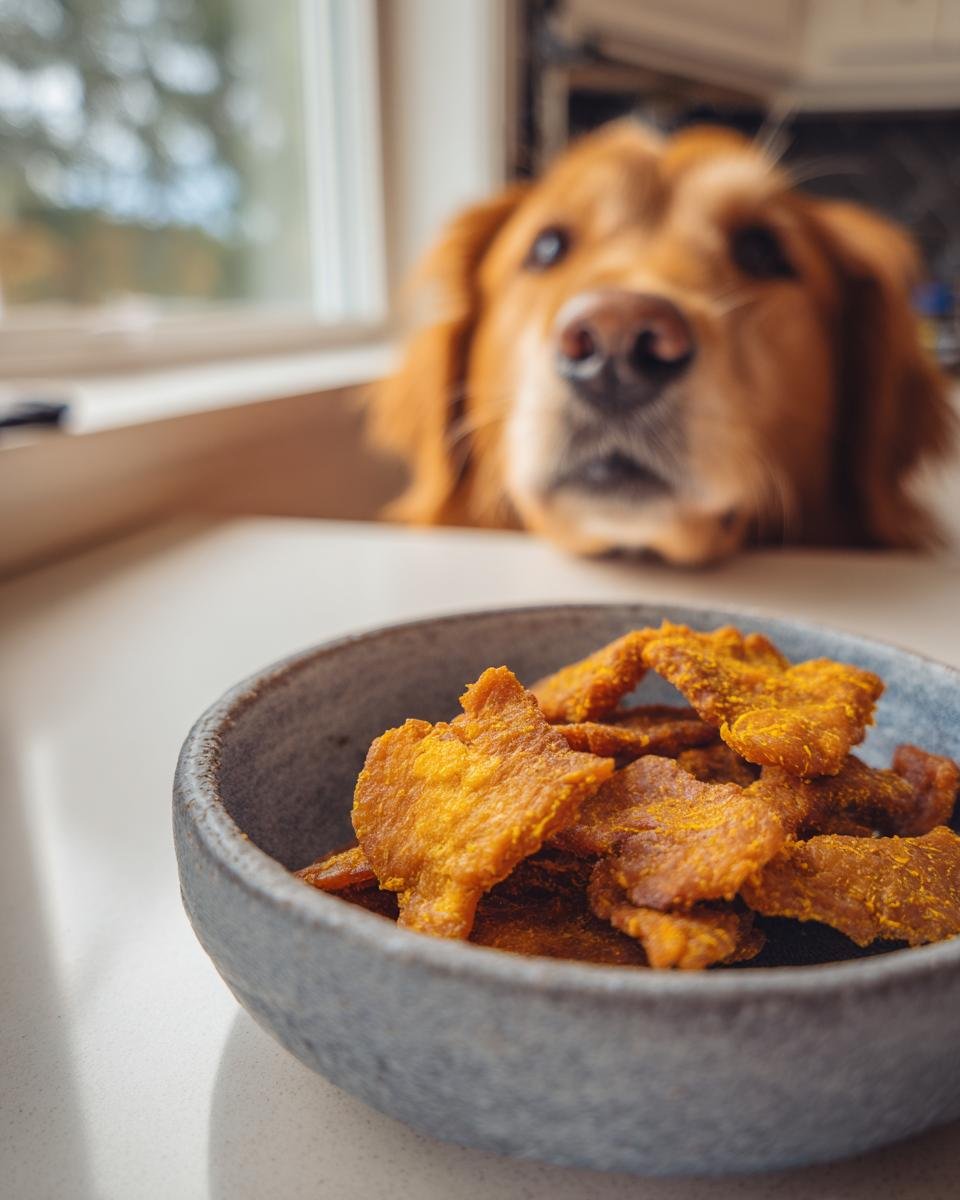
Is this Chicken Turmeric Anti-Inflammation Jerky safe for dogs?
This particular recipe for Chicken Turmeric Anti-Inflammation Jerky is generally safe for dogs in moderation, *but* I always recommend being cautious, especially with the added ingredients like soy sauce and honey. Dogs can be sensitive to high sodium and sugar content. If you’re making it specifically for your furry friend, I’d suggest using a pet-specific jerky recipe where the ingredients and quantities are optimized for them. Always consult your vet if you’re unsure!
Can I make this spicier?
Oh yes, you can totally crank up the heat! If you love a good kick, just add a pinch of cayenne pepper or a little bit of red pepper flakes into the marinade along with the other spices. You can experiment with small amounts until you find the perfect level of spice that makes your taste buds sing!
Estimated Nutritional Information
Just a heads-up, folks! The nutritional info for homemade treats can wiggle around a bit depending on the exact ingredients and brands you use. But, for a serving of about one ounce of this tasty Chicken Turmeric Anti-Inflammation Jerky, you’re looking at roughly:
- Calories: Around 100
- Fat: About 3g
- Protein: A healthy 12g
- Carbohydrates: Around 6g
- Sugar: About 5g
- Sodium: Roughly 400mg
It’s a pretty great balance for a satisfying snack!
Share Your Chicken Turmeric Anti-Inflammation Jerky Creation!
Alright, I’d LOVE to see how your Chicken Turmeric Anti-Inflammation Jerky turned out! Did you get that perfect golden hue? Let me know in the comments below how it tasted and if you tried any fun variations. Feel free to share photos on social media – I’m always looking for new jerky inspiration! If you have any questions or just want to say hi, you can always reach out to me here.
Print
Chicken Turmeric Anti-Inflammation Jerky
- Total Time: 4 hours 15 min
- Yield: Approx. 1/2 pound
- Diet: Gluten Free
Description
Homemade chicken jerky infused with turmeric for its anti-inflammatory properties.
Ingredients
- 1 pound boneless, skinless chicken breast
- 1/4 cup soy sauce
- 2 tablespoons honey
- 1 tablespoon olive oil
- 1 teaspoon ground turmeric
- 1/2 teaspoon garlic powder
- 1/4 teaspoon black pepper
Instructions
- Slice chicken breast thinly, about 1/8 inch thick.
- In a bowl, whisk together soy sauce, honey, olive oil, turmeric, garlic powder, and black pepper.
- Add chicken slices to the marinade and toss to coat.
- Cover the bowl and refrigerate for at least 4 hours, or preferably overnight.
- Preheat your oven to 170°F (77°C). Line baking sheets with parchment paper.
- Arrange chicken slices in a single layer on the prepared baking sheets, ensuring they do not overlap.
- Bake for 4-6 hours, or until the jerky is dry and leathery. The time will vary depending on the thickness of your slices and your oven.
- Let the jerky cool completely on the baking sheets before storing.
Notes
- For a spicier jerky, add a pinch of cayenne pepper to the marinade.
- Store jerky in an airtight container at room temperature for up to 2 weeks, or in the refrigerator for longer storage.
- Prep Time: 15 min
- Cook Time: 4-6 hours
- Category: Snack
- Method: Baking
- Cuisine: American
Nutrition
- Serving Size: 1 ounce
- Calories: 100
- Sugar: 5g
- Sodium: 400mg
- Fat: 3g
- Saturated Fat: 1g
- Unsaturated Fat: 2g
- Trans Fat: 0g
- Carbohydrates: 6g
- Fiber: 0g
- Protein: 12g
- Cholesterol: 30mg
Keywords: chicken jerky, turmeric jerky, anti-inflammatory, homemade jerky, healthy snack, dried chicken